
This article covers the following topics:
- Accessing the edit tiles view
- Adding new tiles
- Editing tiles
- Order of tiles
Accessing the Edit Tiles View
To get started, click the edit homepage button on the admin bar.
The homepage will load with two options at the top right hand side. Click Edit tiles to add and edit homepage tiles.
To learn about designing your homepage, read Edit homepage.

After clicking the Edit tiles button, the homepage reloads, showing all existing tiles, including those currently not active. Each tile can be edited (see below).
Add a New Tile
Adding a tile is easy. Scroll to the bottom of your Edit tiles screen and click Add tiles.
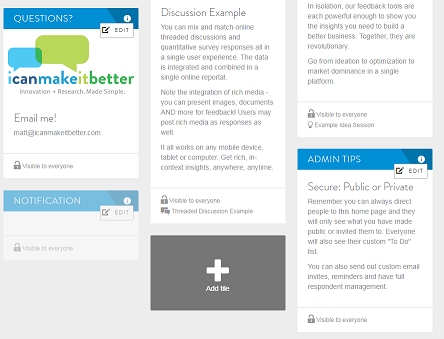
When you select Add tile, a pop-up appears that allows you to create and customize the tile.
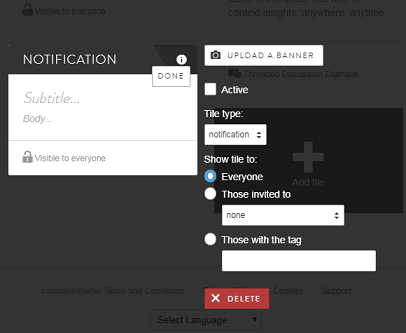
Tile Type:
There are six tile types: one for each of the four activity types, a notification, and twitter feed tile.
Read more about setting up a twitter feed here.
By selecting the tile type, the title of the tile will automatically update. You may also manually update the title. Simply click on the text in the title and type the desired heading text.
Subtitle and Body:
Click on the desired section in the tile to include the content you would like to communicate. For a survey, you may include the topic, how long the activity is available, length to complete, incentive, etc.
Banner or Tile Image:
You can upload an image to the tile to make it stand out and make the homepage more interesting. The image will appear between the tile title and subtitle. Recommended 500 px wide.
Tile Permissions:
This area allows you to set permissions, e.g., which members will be able to see the tile on their community homepage. This can be used to manage communities with member subsets who should not see the same content.
Depending on the tile type, different options are available. For the four activity types, programmed activities can be selected e.g., for survey activities, all programmed surveys and focus groups are available in the dropdown menu.
Only members who were added and/or invited to a select activity will see the tile. As additional members are invited, the tile will appear on their homepage.
Activate Tile:
Once you are ready for members to see the tile, check the Active checkbox. If this box remains unchecked, the tile will not appear on the homepage.
This allows you to create tiles ahead of time and activate them later. You may also deactivate a tile when you are done by unchecking this button rather than deleting the tile.
Save Tile:
Once you have created your tile, don't forget to press done to save your work.
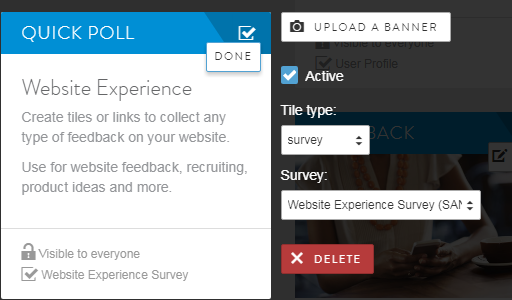
Edit Tile
In the Tile edit view, each tile has an Edit button. Click it to edit an existing tile.
Order of Tiles
Click the reorder button on the top left side of Tile edit view. If you have tiles that are not active and don't need to be reordered, you may deselect Show inactive tiles.
Simply drag and drop tiles in the order you would like them to display them on the homepage.
Note: Tiles will be shown from left to right and then break into the next row. Depending on the screen size of mobile device used or browser window size for personal computers, where a tile appears on the screen will differ. You can test the look by changing your browser window size.
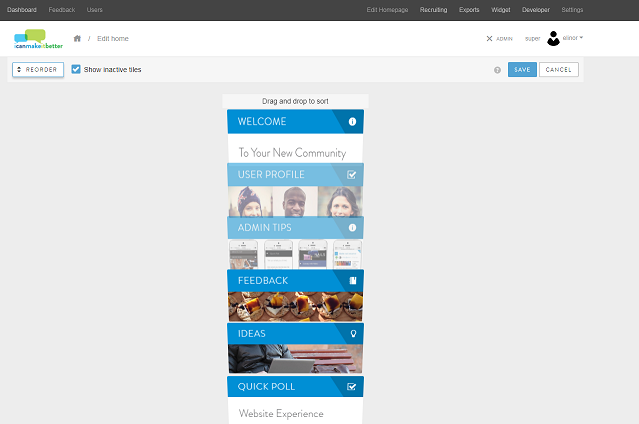
Note: You cannot change the position of the To Do list. It will always be on the top left side of the homepage.
Save before Exiting Edit Tile View
Once you are done editing tiles, make sure to click save on the top right side or your work will not be saved and you will have to re-create your tiles.
We also encourage only one team member to be working on tiles at the same time. If two people are working on tiles at the same time, they may save their updates, and you could lose your work.

Continue reading:
For more details see:
Frequency of Member Engagement
Comments
0 comments
Article is closed for comments.